Ansible Semaphore is a web-based tool for managing Ansible projects and workflows. It provides a graphical user interface that allows us to view and manage our Ansible tasks, playbooks, and inventories in a centralized location. With Semaphore, we can easily manage and monitor our Ansible workflows, schedule and automate tasks, and collaborate with team members in a seamless way. This tool simplifies the management of Ansible projects, making it more accessible to users who may not be familiar with command-line interfaces or coding.
Semaphore is written in Go language, and it is available for Windows, macOS and Linux (x64, ARM, ARM64). Ansible Semaphore is an open-source project with high-quality code.
We will install and configure Ansible Semaphore in Docker, and take a look at its interface and configuration.

Installation
For this review we install Semaphore in Docker.
First, we have to create a docker-compose.yml file in our project directory, specifying the Semaphore and MySQL images, along with the necessary environment variables for each service. We can then run docker compose up to start the containers and initialize the database.
Once the containers are up and running, we can access Semaphore by navigating to http:// in our web browser. From there, we can log in and start using Semaphore to manage our Ansible projects and workflows. <server ip>:3000
Using Docker Compose to install Semaphore with the Semaphore and MySQL images simplifies the installation process, as we don’t need to worry about configuring the entire environment manually.
Note that at the time of writing, TLS communication is not yet available in Semaphore. This means that all communication between Semaphore and its clients is unencrypted. While this may not be an issue for some use cases, it’s important to be aware of the potential security implications.
The Semaphore team is actively working on implementing TLS support, so this limitation should be addressed in the near future. In the meantime, it’s recommended to use Semaphore in a secure environment and avoid transmitting sensitive data over the network.
If we’re concerned about the lack of TLS encryption in Semaphore, using an HTTP proxy with TLS settings can be a viable solution. By configuring an HTTP proxy with TLS encryption, we can ensure that all traffic between our clients and the proxy is secured. This can help to mitigate the security risks associated with unencrypted communication in Semaphore.
To set up an HTTP proxy with TLS encryption, we’ll need to configure the proxy to use a valid SSL/TLS certificate and configure Semaphore to use the proxy as its HTTP(S) proxy.
Keep in mind that this will only encrypt traffic between our clients and the proxy; traffic between the proxy and Semaphore will still be unencrypted. However, using an HTTP proxy with TLS encryption can provide an additional layer of security for Semaphore users until TLS support is natively implemented.
Our docker-compose.yml file should look like this example:
services:
  mysql:
    restart: unless-stopped
    ports:
      - 3306:3306
    image: mysql:8.0
    hostname: mysql
    volumes:
      - semaphore-mysql:/var/lib/mysql
    environment:
      MYSQL_RANDOM_ROOT_PASSWORD: 'yes'
      MYSQL_DATABASE: semaphore
      MYSQL_USER: semaphore
      MYSQL_PASSWORD: VerySecretPassw0rd
  semaphore:
    restart: unless-stopped
    ports:
      - 3000:3000
    image: semaphoreui/semaphore:latest
    environment:
      SEMAPHORE_DB_USER: semaphore
      SEMAPHORE_DB_PASS: VerySecretPassw0rd
      SEMAPHORE_DB_HOST: mysql
      SEMAPHORE_DB_PORT: 3306
      SEMAPHORE_DB_DIALECT: mysql
      SEMAPHORE_DB: semaphore
      SEMAPHORE_PLAYBOOK_PATH: /tmp/semaphore/
      SEMAPHORE_ADMIN_PASSWORD: VerySecretAdm1nPassw0rd
      SEMAPHORE_ADMIN_NAME: admin
      SEMAPHORE_ADMIN_EMAIL: admin@localhost
      SEMAPHORE_ADMIN: admin
      SEMAPHORE_ACCESS_KEY_ENCRYPTION: gs72mPntFATGJs9qK0pQ0rKtfidlexiMjYCH9gWKhTU=
      SEMAPHORE_LDAP_ACTIVATED: 'no' # if you wish to use ldap, set to: 'yes'
      SEMAPHORE_LDAP_HOST: dc01.local.example.com
      SEMAPHORE_LDAP_PORT: '636'
      SEMAPHORE_LDAP_NEEDTLS: 'yes'
      SEMAPHORE_LDAP_DN_BIND: 'uid=bind_user,cn=users,cn=accounts,dc=local,dc=shiftsystems,dc=net'
      SEMAPHORE_LDAP_PASSWORD: 'ldap_bind_account_password'
      SEMAPHORE_LDAP_DN_SEARCH: 'dc=local,dc=example,dc=com'
      SEMAPHORE_LDAP_SEARCH_FILTER: "(\u0026(uid=%s)(memberOf=cn=ipausers,cn=groups,cn=accounts,dc=local,dc=example,dc=com))"
    depends_on:
      - mysql
volumes:
  semaphore-mysql:
We have to edit the MYSQL_PASSWORD, the SEMAPHORE_DB_PASS and the SEMAPHORE_ADMIN_PASSWORD fields.
Then we have to create a new value for the SEMAPHORE_ACCESS_KEY_ENCRYPTION key with the following command:
head -c32 /dev/urandom | base64
Then we run docker compose to start up the MySQL and Semaphore services:
docker compose up
We have to see the following output:
...
semaphore_docker-semaphore-1  | Semaphore v2.8.90
semaphore_docker-semaphore-1  | Interface
semaphore_docker-semaphore-1  | Port :3000
semaphore_docker-semaphore-1  | Server is running
The Semaphore service is now available on the http://<server ip>:3000 URL.
In our current setup we do not have any TLS configuration!
Initial configuration
After the installation we have to configure the test data in our Ansible Semaphore service!
To set up a Semaphore project, we’ll need to connect to our version control system, define our build environment, and configure our project settings in Semaphore.
First, we’ll connect to our version control system, select our project repository, and configure our branch settings.
Next, we’ll define our build environment by specifying the operating system, language, and any dependencies required for our project.
Finally, we’ll configure our project settings, such as specifying our build commands and defining any notifications or deployment workflows.
With these steps completed, Semaphore can automatically trigger builds for our project whenever changes are pushed to the repository, making it easy to automate our CI/CD pipeline.
Create a new project
A Semaphore project is a term used to refer to a specific software or infrastructure project that is being managed and built using Semaphore. In Semaphore, a project typically corresponds to a Git repository, and consists of a set of configuration files that specify how the project should be built and deployed. The configuration files can include information about the project’s build environment, such as the operating system and language, as well as the build commands, test scripts, and deployment workflows that should be executed when changes are made to the project’s codebase. Semaphore provides a web-based interface that allows users to manage their Semaphore projects, view build logs, and monitor the status of their builds and deployments. By automating the build and deployment process using Semaphore, developers can save time and streamline their software development workflows.
As we just installed Semaphore we have to create our first project.
Later we can add new projects to Semaphore using the top left side of the screen. We have to click on the current project name that will open the drop down menu. The New project... menu will add new projects to Semaphore.
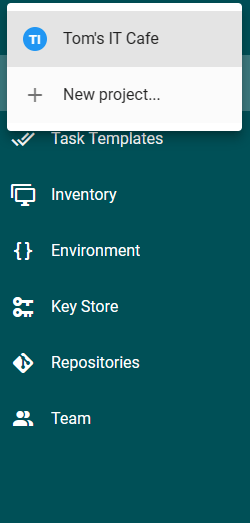
Note: the user who creates a project will be a member of the project automatically!
Add new users to the system
On the bottom left of the screen let’s click on the name (currently it is “admin”) and choose the Users from the menu.

On the top right we can add new users with the NEW USER button.
Let’s fill the form and mark our new user as admin then save it!
Fill the Key Store
In the Key Store menu we use the New Key button to add our SSH private key and become password.
We can choose these two types for our secrets:
"SSH Key"for key-based SSH login."Login with password"for password logins, but it can be used as an Ansible vault password and become password as well.
The SSH key will be used to pull data from our Github repository and for authenticating to the managed hosts.
The become password will be used to switch user to root on the remotely managed machines.
Add our playbooks and roles repository to the system
We have to add a project repository with our roles and playbooks.
The Repositories menu has the New Repository button on the top right of the screen.
We have to give it a human readable name, a repo URL, the branch we want follow and we have to choose an access key for the repo. The SSH private key will used to authenticate to Github in our case.
Create environments
The environments section sets environment specific variables to our tasks. We have to add at least one environment to our configuration. We can do it on the top right corner of the screen.
We create a Lab environment with empty variable JSON data.
Create inventories
It’s time to create our first inventory for our Semaphore configuration.
We can add a new inventories on the top right corner of the screen.
At the time of this article we can choose to create a static INI or YAML inventory, or pull the inventory file from git and refer to the file name.
An inventory should have a name, we have to set our SSH key as User credential for authenticating on the remote machines, and we have to choose the password we created in the Key Store for privilege escalation.
The IP address / DNS entry of the remote machine goes into the text box.
Task Templates
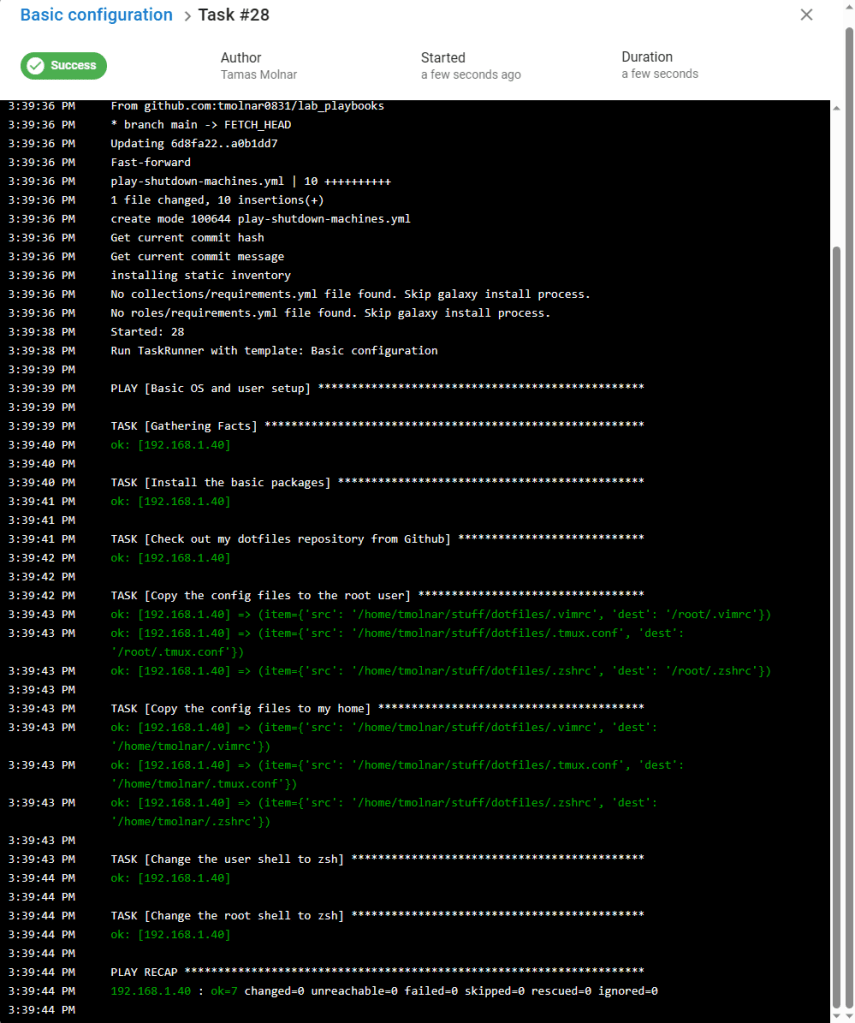
We are ready to create our first task template!
These templates will run our playbooks.

There are three types of task templates in Semaphore, task, build and deploy.
Now we configure just a simple task template for running playbooks.
When we run this template it will:
- pull the playbooks/roles/metadata/vault/etc. from Github
- look for the
play-base-config.ymlplaybook - download the requirements if there is any in the metadata files
- match the hosts in the VBox lab inventory (there is only one host there right now)
- and run the playbook on the target host
We will see the output of the playbook on our screen:
Conclusion
After having some experience with Ansible Tower (Ansible Automation Platform) I set my expectations very high before I checked Semaphore.
My initial feelings were good, the installation was smooth using Docker and the official containers. (I will try to install it from the .deb on Debian later.)
It was quick and easy to add the test data to Semaphore and to run the first task with some documentation reading, but the software could not authenticate to the freshly deployed remote host.
With about 10 minutes log reading and internet browsing the workaround just came up: in the environment variables I had to add the following:
{
  "ANSIBLE_HOST_KEY_CHECKING": "False"
}
Obviously after understanding the issue better it is not the most secure solution, but it was a great workaround for testing Semaphore.
I still don’t understand what administrative rights on a project mean, it is a topic for further testing. I guess that the project administrators are separated from the Semaphore operational admins.
In my opinion the HTTPS communication is mandatory for production, so it is still a huge security issue. An nginx or apache proxy can make it, but it will only encrypt the communication between the client and the proxy server. The communication between the proxy and Semaphore are still unencrypted.
Ansible Semaphore is an open source and free project. It is beautiful and fast in the test environment, but unfortunately I cannot recommend it for production systems yet. The lack of encrypted communication is still a reason for not going with it in production.
Join the Discussion! I’d love to hear your thoughts and experiences on the topic! Share your insights, ask questions, or engage with fellow readers in the comments section below!
Ansible Semaphore: https://www.ansible-semaphore.com/
GitHub: https://github.com/ansible-semaphore/semaphore
Issue Tracker: https://github.com/ansible-semaphore/semaphore/issues
Discover more from Tom's IT Cafe
Subscribe to get the latest posts sent to your email.

Hi
I’m looking simple information about.
I tried google, semaphore docs and still I’m dumb.
There is only info about coockie/enc-key settings.
Maybe it’s obvious for proffessionals.
I cant get this info.
What is key store encryption alghoritm?
LikeLike
All of the tools use standard AES encryption.
LikeLike